Barry's Mix Magazine Equipment And Software Reviews
Barry's Massive Discography And Engineering Career
Barry's Music Connection Magazine Reviews
Barry's Resolution Magazine Reviews
Baby Audio Smooth Operator Pro
Spectral Signal Balancer For Detail Inside a Track
By Barry Rudolph
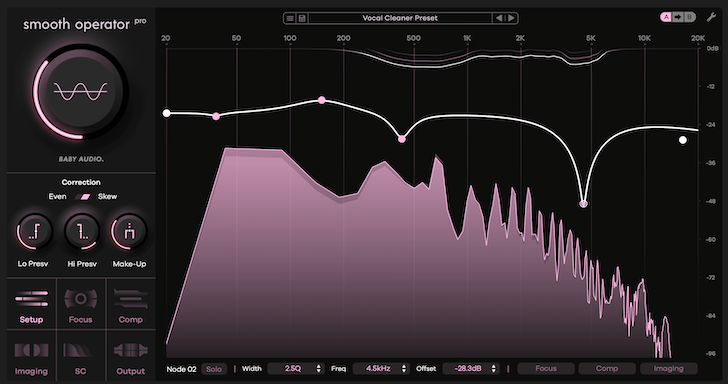
Originating in Denmark and now based in California, Baby Audio is the brain-child of Caspar Bock Soerensen. Smooth Operator Pro is the newest arrival in a growing family of now twelve, forward-looking processors. Smooth Operator Pro is a Spectral Signal Balancer tool that the allows for the editing and restructuring of many of the internal components of recorded sound including both the pleasantly euphonic elements as well as uglier, nasty resonances. Smooth Operator Pro updates and vastly improves on the original Smooth Operator first introduced in 2021; practically speaking, it is an all-new software system. Nodes And Frequencies Smooth Operator Pro (VST/AU/AAX) opens with a large, resizable window that displays a horizontal centerline populated with nodes, the center frequencies of individual, bell-shaped peaking filters. This is in addition to the default nodes 1 and 12 that are high-pass and low-pass filters, respectively. A maximum of 10 nodes can be added or removed by double-clicking (right-clicking on PCs) anywhere on the centerline. One of the major new additions in the Pro update is a large, global Threshold control knob that adjusts all threshold nodes simultaneously. By lowering the global threshold level, the areas of frequency buildups are displayed spectrally from 20-Hz to 20-kHz in a rectified display at the top part of the GUI. I used this unique feature to assess what frequencies or bands of frequencies might be problematic. When a node is clicked on, and selected, its node number and the numerical values of its Q, center frequency and level (boost or cut) are shown in the Parametric Node Controls (PNC) window located at the bottom left of the GUI. Any node can be set with a Q of up to 10 and is adjustable to cut up to -80dB or boost up to +16dB.
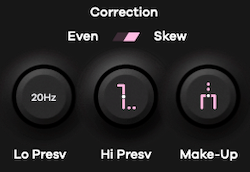
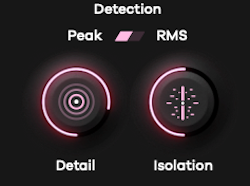
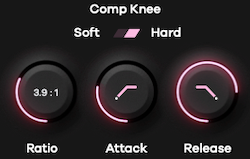
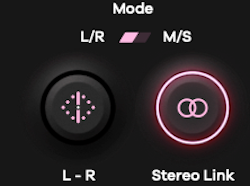
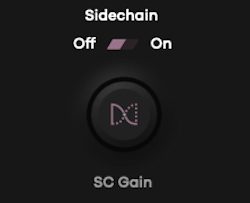
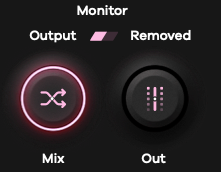
The 10 peaking nodes are named numerically in the sequence in which you have inserted them. When Smooth Operator Pro is first inserted into a channel, the default instance has four peaking nodes--nodes 2 thru 6. If you solo any of these nodes by clicking on it, in the PNC you'll see its number, Q, Gain, Frequency, and Offset. Offset indicates (in dB) the spectral peak reduction threshold offset from the global threshold setting. Back in the main GUI window, you'll see a large, overlaid bell-shaped Q curve depicting its width (Q). While in this solo mode, you may "tune in" the exact frequency you're interested in by dragging the node horizontally across the centerline from to lower to higher frequencies! This works like a control on a analog filter set and I loved it for quickly finding and lessening annoying resonant peaks, de-ssing, percussive ticks and other noises. Controlling the Details For fine tuning, there are a set of six Detail controls in a window on the left side of the GUI: Setup, Focus, Comp, Imaging, SC (side-chain setup), and Output. This is where you dial in the precise adjustment of the 12 nodes using the Threshold knob or individually by overriding the global settings node by node. Setup Clicking on Setup shows specific details governing the entire correction process. You may choose a processing curve between Even (flat) or Skewed, a perceptually pleasant curve, that I liked for full music mixes, instruments and ensembles with wide frequency ranges such as pianos, drum kits, synths, choirs and so on. I should interject here that small, parallelogram buttons sit at the top of each of the six Detail control windows. You can select between these two choices but it's hard to discern which state they are in when first opening any of the Setup windows. In Setup, there are also Lo and Hi Preserve controls--curves that limit the correction frequency range of detection and processing. Any audio program above and below these settings passes through un-corrected, although the Hi preserve knob seems to work backward for me. Now, back to the main controls. Focus The Focus Detection window has Peak/RMS detection choices along with Detail and Isolation controls. Detail sets the resolution of the spectral peak detection. For full mixes, I recommend choosing a low percentage. For problems, such as reducing a resonance peak or setting up a de-esser notch, go with a higher percentage. The Isolation control determines how much the surrounding frequencies are affected. For fun, I maxed the Isolation control to show the highest peak energy resolution using a rectified signal waveform shooting downward from top of the screen as the waveform is more visible with extreme settings. I could boost frequencies (or returned them to flat) around a deep notch to lessen the "collateral damage" brought on by severe de-essing. Comp Knee Comp has typical compressor/limiter choices for either Hard or Soft knee compression. It has Attack times from 0ms to 500ms with Release times ranging from 10ms to 500ms and Ratios running from 1:1 to 10:1. These parameters worked out fine, and Comp became my starting point because as I will explain later, any node(s) compression settings can be excluded from the Global settings. Imaging Mode Imaging allows for spectral peak reduction in conventional L/R stereo or in Mid and Side (M/S) mode. Processing the Center (Mid) brings out the center relative to the Sides. Processing the sides widens the stereo width at the expense of mono-compatibility of your mix. Overriding low frequency nodes excludes frequencies that may phase-cancel when the L/R channels are combined in mono. Global Imaging is excellent for checking stereo mixes and/or correcting problems in a finished and printed mix. Sidechain Mode Sidechain sets the level of an external controlling input and has a bypass button. Output Monitor Output has the Output and Wet/Dry controls, and adjusts the output level of the entire plug-in. Typically, I would match processed levels when Smooth Operator Pro is bypassed in a chain. I found myself continually A/Bing and resetting the output control and/or its Wet/Dry mix control. Override Global Overriding global settings demanded its own parameter windows and Smooth Operator Pro includes three individual windows with the same set of node parameters available to override the global settings. They are Focus, Comp, and Imaging and located at the bottom right of the main window. Clicking on a node allows for node-by-node global overriding for achieving unique sound treatments or dealing with unusual spectral problems. Any of these three windows, when clicked on, come up in bypass and are shown in a dimmed display with the same set of parameters as in their global settings. If you're like me and pick a preset and then tweak it to fit your music. I always check to see if any are (inadvertently) overriding the global settings. While in use, these will change color to indicate they are in play. For creating an overall signature-sounding mix, I liked processing the backing track separately and recombing it with the vocal production. Awesome New Tool!For me, Smooth Operator Pro opens up unlimited sonic possibilities, and I find a new way to use it almost every time I open it up. I especally like it for rebalancing or mastering full, already finished mixes, fixing poorly recorded vocals, stylizing drum loops, creating quirky tracks and vocals, dialing in samples, and much more. I think it is Baby Audio's best work to date.
Future Plc, an international media group and leading digital publisher. All Rights Reserved.
|