
Barry's Mix Magazine Equipment And Software Reviews
Barry's Massive Discography And Engineering Career
Barry's Music Connection Magazine Reviews
Barry's Resolution Magazine Reviews
Nugen Audio SEQ-Plug-In
Linear Phase Equalizer
By Barry Rudolph
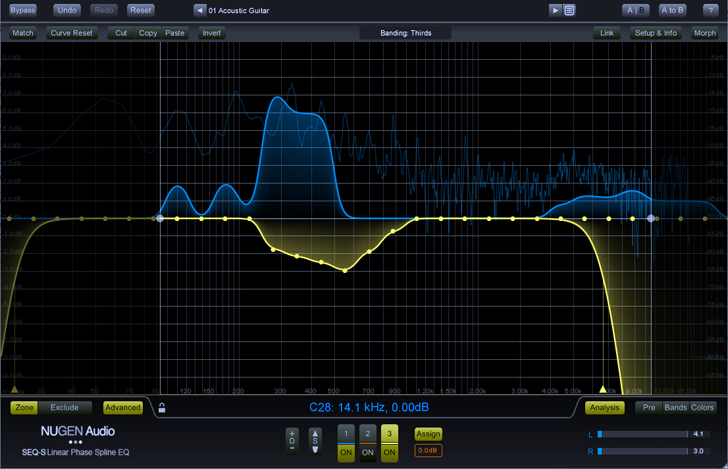 |
| Nugen Audio SEQ-S Linear Phase Equalizer Screen Shot |
The SEQ-S and SEQ-ST are the two models of Nugen Audio's new linear phase equalizer plug-ins. The SEQ-ST is for mono/stereo/stereo mid-side processing while SEQ-S works for up to eight channels of audio although, as yet, there is no Dolby Atmos version available.
Both the SEQ-S and SEQ-ST operate exactly the same; the SEQ-S version is reviewed here. The SEQs are called "spline, match and morph" equalizers, and they run as Native plug-ins in AAX, AU, VST 2 and 3 in MACs OS X 10.9 or later and PCs Win 7 SP1 or later.
These equalizers use Fast Fourier Transform (FFT) math rather than Infinite Impulse Response (IIR)-based algorithms like most digital equalizers. Phase shift through SEQ is linear across the entire frequency range for a smooth, natural equalization but at the cost of more processing delay or latency. A single stereo instance of SEQ-S will be 12,288 samples late and must be delay-compensated properly in your DAW. Compensation is automatic in Pro Tools HDX Ultimate or any modern DAW system.
A Novel Approach
SEQ-S uses a unique, and all-new approach to the equalization process and to get proficient at using SEQ effectively and quickly, there is a learning curve required. Unfortunately, the manual is more like a quick-start guide without much technical depth.
The SEQ-S has a resizable GUI and allows using a mouse to directly draw a "spline" of a shaded EQ curve called an EQ Envelope. An EQ spline has many consecutive Control points, or nodes, shown in a color of your choice superimposed over a matching color spectrum analyzer display. There are several choices for the spacing or banding of these nodes with 1/3 octave as the default. As drawn, the spline is a curve that smoothly connects between points.
You may add, delete, and drag existing Control points easily, and if you make an unintended change, you may click the plug-in's Undo/Redo button without limit during a session. There are also both High-pass and Low-pass filters represented by very small triangles the same color as the EQ spline representing the cut-off point for these filters. They are hidden at the extreme left and right lower corners, and you have to "mouse over" them to discover and use.
 |
| Nugen Audio SEQ-S Box |
With this version, the analyzer display and its numerical scale values for amplitude (Y axis) and frequency (x axis) are too dim to see well and there is no way to brighten them up. For this reason I always resize the plug-in as large as possible.
Assigning, Managing, and Controlling EQ Envelopes
There are three simultaneous color-coded EQ Envelopes available that are useable on any of up to 8-channels in SEQ-S. Click on the Assign button and a routing matrix comes up to designate which EQ Envelopes are assigned to control which channel(s). The SEQ-ST version could control L/R as one EQ Envelope, or the left and right or mid and side components as separate EQ Envelopes. The stereo matrix/de-matrix is automatic but there is no way to control individual levels (in the plug-in) apart from just equalization.
The Envelope Selector section in the middle of the GUI has three, hide/show buttons labeled 1, 2, and 3 for managing the three EQ Envelopes. There are also three ON buttons that toggle the EQ Envelope on/off and enable mouse control of its curve only, without inadvertently affecting the other envelopes.
Both the ON button and EQ Envelope must be lit up to change and hear that particular EQ Envelope. So you can show/hide all three envelopes but only control one at a time. Because each EQ Envelope is controlling a separate audio source, there is no resultant graphical representation of the algebraic sum of multiple EQ Envelopes.
You may view the input signal's spectrum (Pre button) before equalization or afterwards as the EQ is applied.
Just above the Envelope selector is the Parameter Readout display that confirms both the frequency of the current (mouse over) control point in the active EQ Envelope and that point's amount of boost/cut. But in the readout, envelopes are given numbers so envelope 1 is called "A" in the Parameter window. This is because the parameter readout also shows the particular number of the Control point from low to high.
Click on the Assign button and a routing matrix comes up to designate which EQ Envelopes are assigned to control which channel(s). Using the SEQ-S on stereo tracks and you'll have a regular stereo EQ controllable by a single envelope or use two envelopes for equalizing the left and right channels separately or use two for different Mid and Side EQs.
Multi-channel track instances of SEQ-S will control up 8 channels using all three EQ Envelopes. Channels of audio cannot be controlled by more than one EQ envelope. All channels have their own separate VU meters color-coded by envelope.
Another helpful feature is called Zone. Zone uses two large white dots on the 0dB axis line to put upper- and lower-frequency borders preventing any changes outside the zone's borders. You may also click Exclude and prevent any changes within the zone's borders. The locked out zone(s) are automatically dimmed in the display.
The Lock Feature
I had trouble inadvertently scrolling, zooming in/out, and adding extra and unwanted Control points until I found the Lock symbol in the Parameter Readout display. After inserting SEQ S and before drawing any curves, I would first reset the plug-in and then click on the padlock to lock both L/R frequency horizontal scrolling and +/- vertical amplitude scrolling. Without first locking scrolling, using SEQ is hopelessly frustrating.
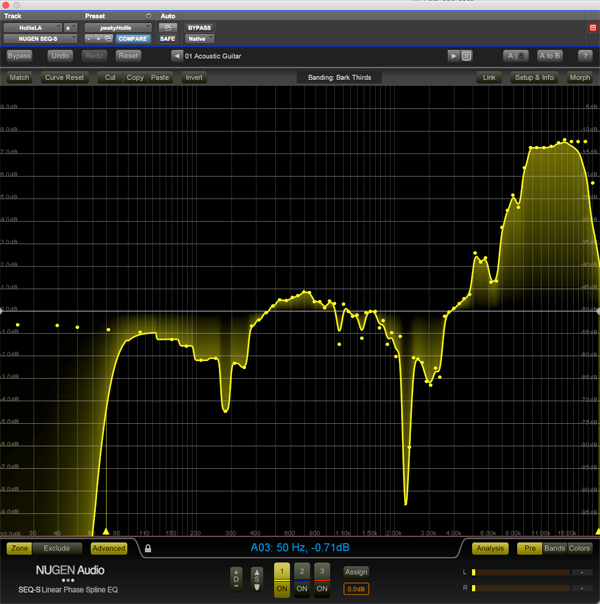 |
| A Nasty Vocal Track Fixed |
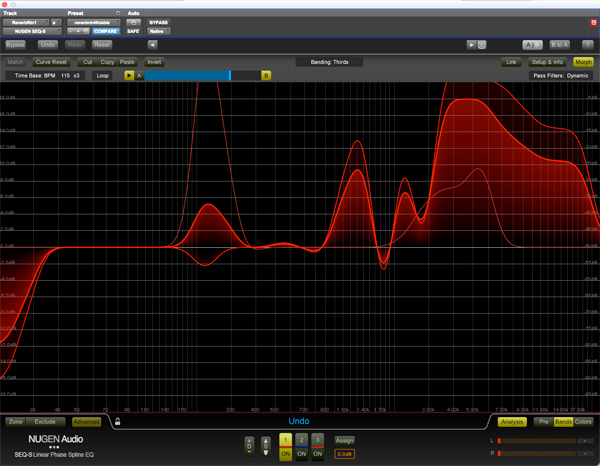 |
| Morphing A Reverb |
Banding
At the top of the GUI, is a pull down menu of advanced Banding choices that fixes the positions, or the Bands, between two control points. There is a choice between: Thirds or equal 1/3 octave bands (default); Sixths or 1/6 octave bands (my choice for mixing); and Chromatic intervals, which offer the finest overall resolution. Finally there are three Bark and Mel scale banding choices.
A Bark scale is psychoacoustic measure of frequency divided into 24 bands that are equal in a physiological sense based on how well the human ear can differentiate frequencies. Looking at the 24 Control points while in Bark banding, you'll see the bands come closer together, with more points in the mid-range from about 400Hz to 4kHz where the ear is most sensitive. Bark Thirds doubles the number of control points for even more resolution in the mid-range and Mel banding is based on a different academic study.
Mixing, Matching, Morphing
EQ Matching
EQ matching is a two-part process. Use the free Nugen Send utility to transmit audio from a reference track (in your session) to another track with SEQ-S placed on it. In this case, I wanted the EQ Envelope of a live drummer's kick drum in place of the thin and small bass drum on another kit--there was no time to sample, trigger, replace and check accuracy.
Using the Send plug, I recorded and saved a few seconds as a "snapshot" of the live kick drum as reference. The Send Utility automatically routes the audio and mutes it from the mix bus. Next I recorded a snapshot of the existing drum. Click on Match, and you'll see the EQ curve instantly conform to the reference--it is like magic!
Match EQ works especially well for audio with low harmonic complexity and minimal dynamic change like kicks and snares. One good use is to create a "dip" in the entire track mix but only in the frequency range of the lead vocal or a voice-over. Once I recorded a snapshot of the track and another of the lead vocal, I inverted the results with the Invert button and, again, like magic, a section in the midrange frequencies was carved out corresponding to the lead vocal's frequencies.
Next to the Envelope Selector, and to facilitate SEQ'a EQ matching feature, are the "D" and "S" controls. Depth is a +/- control that changes all the envelopes' intensities together like a Wet/Dry fader. The Sharpness up/down control works similar to a global Q for all EQ envelope curves. Sharpness flattens/sharpens the curves with Depth, again, the strength of them. Both these musical controls are very innovative touches I found useful all the time when using SEQ. Again, more digital equalizers should have this very handy feature.
EQ Morphing
Clicking the Morph button reveals another control bar to configure EQ morphing changes between temporary EQ memories resident in A and B. The Morph Play button is automatable like everything on SEQ, and, once you create an EQ Curve for A--let's call it your "starting EQ"--and then your "destination EQ" in temporary B memory, you can program morphing between them.
You can set up (and automate) a one-shot single transition from A to B or from B to A. Return mode means one shot and back again, and Loop mode is morphing back and forth between A and B. The time period it takes to morph is based on session tempo in any subdivision or free running. Rapidly changing freely or in sync with your session opens up another avenue for sound design or special effect.
A Good Uses And Reverb Effect
I think an excellent use for EQ Morphing is in post-production where the ambience of the location sound (artificial or natural) changes drastically in level, noise floor and room tone. Dialog editors could use EQ Morphing to lessen the abruptness of these transitions.
I was looking for a different and unrecognizable effect for a stereo pad. I split the stereo pad into two mono tracks panned hard left and right and put separate mono instances of SEQ-S on both sides set to morph between to different A and B temporary EQ settings. I had the EQs loop morph at different tempo subdivisions of 115 BPM--the 1/4-note tempo of the song. Depending on the EQ differences between A and B and also the tempo differences, this produces an almost a chorus-like or tremolo effect, but without any pitch change typical of chorus effects. This is a completely all new effect that is controllable from subtle to drastic science-fiction sounding! And I have it saved as a preset!
Mixing And Bark
Using Bark Thirds Banding and in full-screen GUI makes it possible to microscopically focus on the midrange frequencies. I had a mix to do with a singer who pushed certain notes and intense moments up to 15dB by way of either poor mic technique or improper recording engineering--whatever. Previously, through clip gain, automation, EQ changes, and compression, I could manage to get her vocal track to "sit" well in the track. That took a lot of time over the course of the entire mix.
I took all that processing off and started fresh using SEQ-S.
For sculpting lead vocals, I like to view in Pre (but always hearing the applied EQ's affect)--the incoming spectrum where I can see and hear the nasty bits and get confirmation of my changes on the Parameter readout.
My singer had some nasty peaks at 2.3kHz, 1.7kHz, 1.1kHz, and others but lesser so. When singing low, she had a big buildup (proximity effect or a wrong mic choice??) at 250Hz. I put dips at all those specific frequencies and others--the biggest correction at -9.2dB at 2.3kHz! I liked to mouse over a spot (no clicking) and seeing what I had done and use both the Depth and Sharpness controls for fine-tuning this audio surgical procedure. This process took less time and sounded more natural and less "fussed with."
Once I got the hang of using SEQ-S, I got comfortable using it as an everyday mixing or mastering EQ and effects generator. Every time I use it, I save what I've done as a preset. I feel like I am developing a good collection of great sounding tools I can use over and over by just slightly tweaking my saved presets.
SEQ-S comes with 22 factory presets that get you close to all it is possibilities.
Awesome!
|
|
|
|
|
|


