| Back To The Directory |
Bloom Adaptive Tone Shaper by Oeksound
By Barry Rudolph
 |
| Bloom Adaptive Tone Shaper by Oeksound |
Founded in 2016, Oeksound is based in Helsinki, Finland and Bloom is their fourth plug-in after Sooth, Spiff and Soothe2. Bloom continuously analyzes the incoming audio and corrects it to be the "optimal version of it" with a "more even, refined sound".
Bloom "looks at the overtone series in the audio signal with regard to warmth clarity and balance of the signal". Interestingly, when the compressor comes into play, its threshold setting is "loosely mapped" to the equal-loudness curve. For example: in the case for frequencies where our ears are more sensitive, the compression ratios are reduced and threshold levels are lowered for gentle compression.
The goal is a balanced sound but includes your own preferences and the ability to adjust each of the four band's "Tone Controls" to your own taste. The four tone controls look like bands in a multi-band processor except there is no designated crossover frequency specified. Oeksound calls them Tone Controls for that reason and you can think of them as working like the EQ curve in Soothe2--another Oeksound processor. Bloom can be used as "touch up" processor on any mono or stereo track of any instrument of voice or as special compression effect at extreme settings.
Understanding The Processing Graph
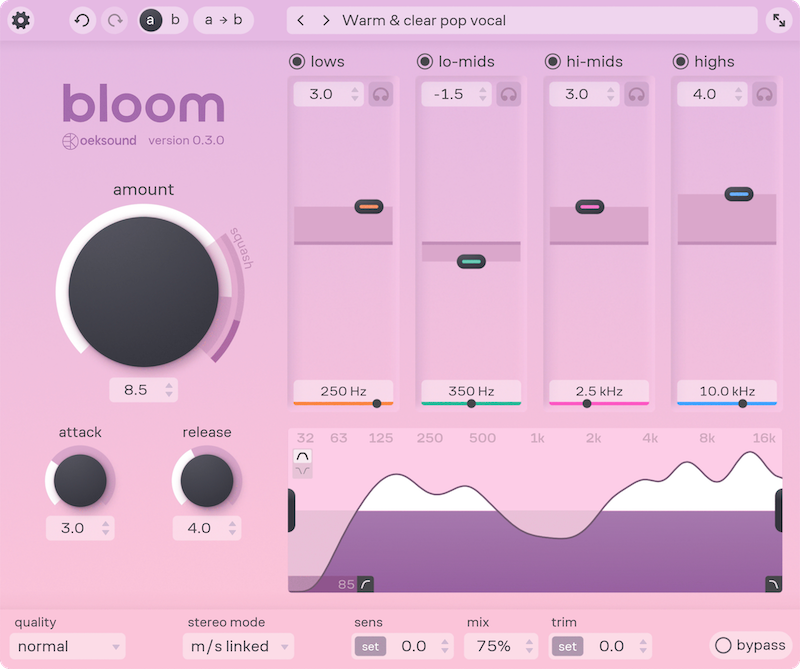
Although there are plenty of presets and quick start guides included, I took some time to fully-understand the Processing Graph. It is used to visually monitor and adjust Bloom's operation using the pink, Barbie movie-inspired, constantly-changing Processing Graph. Positioned below the four tone control faders, it ranges from 27Hz to 27kHz and shows each band's processing and its effect on the overall sound.
There is a horizontal black centerline with a purple-colored region below it that constantly changes shape similar to a spectrum analyzer does with an incoming audio signal. This area shows the overall signal of both the input and processed signals simultaneously. I liked that this also works in Bypass although the entire GUI is dimmed. Below the black centerline boosts are shown in gray, while cuts or gain reductions are shown in white.
For boosting/cutting frequencies, the four overlapping frequency bands (lows, lo-midrange, hi-midrange, and high frequencies) make corrections based on the "spectral trend" or the overall set of frequencies and level coming into Bloom. The band faders are called "Tone Controls" and have different color-coded +/- faders to associate their contribution to the new response curve(s) caused by the individual bands' contribution on top of Bloom's automatic corrections. You can immediately see what band(s) are getting the most processing by their band color and also what Bloom is already doing.
With this information, you can decide where to add or subtract to Bloom's automatic correction based on your own taste. Awesome! The manual points out that changes in one band are automatically compensated with changes in other bands.
On the Processing Graph, automatic corrections of Gain reduction are shown in gray while boosts above the black centerline are shown in white. All four bands have individual bypass buttons and a headphone button to audition that band's part of the whole 27Hz to 27kHz spectrum. You may also hold down the Option (Mac) or Alt (PC) key and click on the band and do the same thing.
Besides typing in a specific frequency in each band's frequency box, you can drag any of the boost/cut faders horizontally to dial in the exact frequency. However, you may accidently also change the band's fader gain. If you hold down the Cmd key (Mac) or Ctrl (PC) the gain position of the fader is locked while you move the center frequency of that band around to find the "sweet spot". If you click anywhere on the band except the fader, then the frequency stays locked while changing gain.
Processing Range Mode Selection
You may constrain Bloom's overall frequency range of operation by dragging either the left and/or right black handles. Frequencies outside the processing range are dimmed and left un-processed. These two black handles have slopes ranging from 12dB/octave up to 24dB/octave when the handles are move closer and closer together towards the center.
The default mode called Include is indicated with a small peaking curve and processes the space in between the two black handles. The Exclude mode only works on the frequencies above and below the two black handles.
Exclude is like the most powerful active notch filter I've ever used. Sound designers and electronica producers will love this to process samples and synths using Exclude. Lastly, there are both High and Low pass filters with slopes of 18dB per octave that you may drag with their current frequency always shown.
The Amount Control
There is a Wet/Dry control (I always keep it 100% when developing a sound) but I like the large Amount control to set the overall processing strength; it has default middle position at 5. As you turn it CW, above 7, compression increases for using Bloom as a compressor and below about 3 or 4 is an area for subtle "touch ups" such as for mastering--the overall mix's tonal balance.
Above 7 and up to 10 starts noticeable compression and what the manual calls the Squash Range where frequency-dependent upward and downward compression is applied.
There is a Squash Meter around the Amount control knob to monitor the compression. Bloom's Attack time and Release time controls work like they should and are excellent with the default values good as starting points. You can set very fast attack times to the point where the attack of a snare drum is hardly heard--the Wet/Dry control can restore the attack of the drum if you like the like the sound Bloom makes to the rest of the snare drum sound.
Stereo Operation
I liked that Bloom will run in stereo with a variable L/R linkage up to 100%. In L/R Split mode, the left and right channels do not influence each other. If your stereo mix is good, you can achieve a wider stereo image by unlinking L/R.
In M/S Split, you can separately adjust either Mid or Side components. In 100%, both channels are summed (internally) and analyzed together. At the other extreme, 0%, they are analyzed separately. These are two tools that will fix stereo recordings that are poorly mixed and/or lopsided stereo imaging.
In either split mode, the four Tone Controls divide into separate Left and Right for L.R Spilt or M and S for M/S Split. A small interface shows up between Tone Controls and the Processing Graph. In addition, there is the Focus button for regulating how much Bloom affects either the Left or Right or the Mid and Side. For example, in M/S mode you may not want Bloom on the Mid component only on the Side.
Oeksound's Bloom is another awesome tool for music mixers. It comes with many good presets for mastering, vocals, guitars, and many problem solvers.
Bloom sells for $209 and you can get a free 20-day demo.
Check: Oeksound.com
|
|
|