by Barry Rudolph

Originally Published Online At PSW
|
Studio Drum Miking Techniques
by Barry Rudolph
Originally Published Online At PSW |
|
 Of all acoustic instruments, drums and percussion instruments seem the most elusive to capture with a compelling sound. Pop recordings are (mostly) driven by an unique and attractive drum sound. The definition of what makes a "good drum sound" has been greatly expanded since the advent of drum machines, samplers and the endless manipulations possible with Pro Tools.
Record producers are looking for the drummer to drive the "feel" of the song and their drum sound to "fill" a certain amount of space within the song's recording. Musical tastes and emotion evoke feel while genre and current trends and fashion usually dictate the exact "size" and specific nature of the drum sound. Of course there are always exceptions to any rule.
Size
Size refers to both the actual drum sound itself and the allowed "space" the drums occupy within the recording. Size is equated to all of the following characteristics: realistic (or unrealistic) ambience, a good aural "picture" of the drum stage, good internal drum balance between the individual drums, good low frequencies and high frequencies, punchiness or "weight" in the low mid-range frequencies and dynamic range or how well you can hear the subtle to the loudest hits without distortion.
Perspective
I find that recording drums has very much to do with your monitor mixing as well as the actual sound you are getting on both the individual drums and the total drum kit. Sure, if I place the drum mix well above the rest of the backing tracks, I can hype the listener into thinking the drum sound is big and muscular. Tilted monitor mixes can make you think you have a great kick drum sound merely because it is very loud. Pulling the drum mix back into a more realistic mix perspective reveals the true size of the drum recording as it blends with the rest of the instruments and vocals.
When placed in mix perspective, I can assess the relative tonality and balance of the individual drums and judge the overall kit-ambience quality. Low and high frequencies as well as dynamic range are also better judged at this level. Like a good foundation of a house, if the drum kit sounds good while in relative balance, then any alternative mixing ideas like loud snare and kick drum mixes will work well.
Space
There is exactly 100 percent of available space in any recording. Try as producers and engineers do, you cannot defeat basic physics in the recording studio. If you're recording using 16 tracks and want to add another track, you will have to reduce those 16 tracks by the amount of space you want that 17th track to take up. One of the main attractions of mixing in 5.1 surround is all the additional space you gain with those four extra channels! Mixers feel liberated not having to push the entire mix down a two-track, stereo pipe.
So space is like sonic real estate and a precious resource at that! Working with the producer and drummer will determine how "big" you are going to go with the drum sound to fit into the song and the record.
Recording Philosophy
Being a professional recording engineer, called to take care of critical recordings, I have (over the years) adopted a certain working philosophy of recording. In a word: it is all about OPTIONS. Unless I'm specifically directed otherwise, I try to record everything so that the next person working on the recording (and often it is not me) is given the most possible options for post-processing. This means that I get as big and fat a sound as possible without over-compressing or over-equalizing unless of course the producer wants a certain level of grunge, squash and EQ styling.
I also try to get a quiet and distortion-free recording. With any percussion recording, this means carefully knowing and maintaining proper peak recording levels--unless we're actually looking for intentional clipping.
Strictly speaking, all post-processing will increase both noise and distortion--to a certain degree. Starting with as clean a recording as possible will make future processing sound better. This philosophy has served me well and offers a good starting place to experiment and take the recording session in any direction the artist/producer/engineer team sees fit.
It's not that I don't love all the alternative ways things can sound by way of engineering, it is just my perceived role as recording engineer is best served by NOT trying to "produce" the session by getting a highly personalized tracking sound.
Here are a few insights on miking and recording drums. These are all tried and true "classic" methods that a lot of professional engineers use everyday.
Overheads
The best place to start a drum sound is with the overhead microphones. These mics will tell you just how well the drums actually sound. You'll hear how they're tuned and how good a drummer you have and how the room is adding or subtracting to the sound. If overheads are placed correctly, you'll hear the kit in the actual balance the drummer achieves. If the drummer is a basher who hits the cymbals as hard as he hits the toms, you'll hear that. If your drummer has a squeaky bass drum pedal or noisy hi-hat rig, you'll hear that too.
In short, I always work on the placement (balance), tonality (equalization) and ambience (distance) of the overheads first. I also monitor these microphones in mono when balancing. You have to remember that the drum kit is one big instrument with many individual components. When all the mics are up and mixed in correct balance, you have a total drum sound composite. It's a mistake to think of the overheads as just the mics that record the cymbals. Trying to keep the rest of the kit out of the cymbal mics by way of radical filtering or EQ, gating and super-tight miking is ludicrous.
Separate Tracks
Separate tracks for each of the kit's components is a good luxury to have for highlighting, in the final mix, certain accents, fills and improvisations the drummer may play. If the overhead sound is not good, chances are the individual components are not any better and you will have to work with the drummer to fix that buzzing floor tom or flat sounding snare drum. You can use as many separate tracks as you want and they still can add up to a poor drum sound!
Trying to isolate any problem components by way of extra mics, wacky equalization, blankets or gating is pointless. You might as well overdub each part of the kit separately if you want drum machine-like separation because you'll never get that from a real drummer playing a good drum set.
 |
|
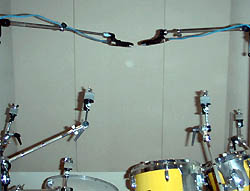
Figure 1 Close-Spaced Overhead Mics
(Cymbals Removed For Clarity) |
These two mics can be setup as an X/Y or M/S pair of stereo mics. If you go with a close pair of overheads, you'll get a strong center image with good phase coherency. Sounds coming from the far left and right of the kit might sound a little quiet in the balance.
Resist the temptation to use more than two overhead microphones--don't put up another mic just to pick up that little splash cymbal on the far left. Far better to move the cymbal closer to the mics or just overdub it later. I've tried using three overheads and had a very hard time getting a non-phasey sound--sometimes it sounds like the cymbals "swish" in and out of phase.
The most popular overhead method is to space them further apart to get good coverage of the kit. Spacing distance is from two to five feet. Listening in mono will tell you if any drums or cymbals are missing or overly loud.
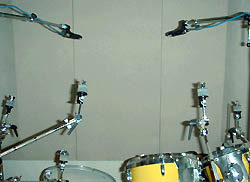 |
| Figure 2 Wider-Spaced Overhead Mics |
Some engineers put the overheads not overhead but behind the drummer'ss back or in front of the kit facing the drummer. The mics are placed much lower, at a level between the cymbals and the toms. This technique usually results in more of the toms and kick, and less cymbal splash and works well for that flailing drummer who hits everything with full force. Be aware that cymbals sound different when miked from underneath.
I always use cardioid mics for overheads but have tried omnidirectional and figure-of-eight microphones. I find less phase anomalies and less of the room comes into the overhead sound with cardioids. I find that I get a "closer" sound on the kit because the sound of the cardioid overhead mics adds better into the sound of the close microphones.
Omnis will produce a more "airy" sound with less directional information--you may not be able to hear a good left and right of the drummer's kit, i.e., floor tom on the left side and hi-hat on the right side (that is what you'd hear if recording a right-handed drummer and monitoring the overheads panned left and right to match the audience's listening perspective).
When labelling tracks in your session, do not just put "L and R Overheads". Because that does not tell the whole story. Call them something like "Left Overhead Ride Cymbal Side" and "Right Overhead Hi-Hat Side". This would mean you imaged the drum sound from the audience's perspective and not the drummer's--a right-handed drummer!
Omnis are going to be "phasey" sounding, and maybe you'll like that sound, although check it in mono to see if anything disappears. Omnis in stereo produce a more spacious drum sound but are a little lighter sounding in mono.
 |
|
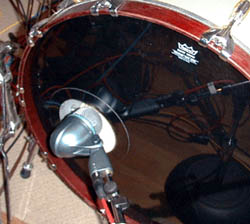
Figure 3
Typical Kick Drum Mic Placement |
Microphone Choices
I like AKG C 414TLII or C414XLII, C 451 or C 452, C 12A or C 12 (if I can get two of them), Neumann KM84 or KM184, or the bright Milab DC-96B for overheads. For omni, try the KM183, and for figure-of-8, try the Royer ribbon R-121 or SF-12 stereo. The Royer mics will require more mic pre-amp gain, and you may want to add top end EQ as compared to the condensers I mentioned. Use any good quality condenser microphones for overheads if you're interested in starting with a full-range overhead drum sound. Shure's KSM44 Condenser or their KSM32 Condenser Mics are good choices too.
Bass Drum
The kick or bass drum is easy to record since it is usually played (in Pop music) at the same volume throughout the song.
Producers and engineers look for a "marriage" or coupling of the bass drum with the bass instrument because they both occupy and make up the important bottom end of the record.
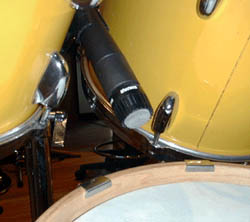
Figure 3 shows my usual starting place for the bass drum mic. The Shure Beta52 in the picture is placed half in and half out of the hole in the front head. This distance is variable and I try to keep the mic pointed exactly at the spot on the rear head where the beater hits.
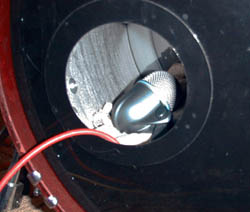
Figure 4 shows an old 1970s trick where the microphone goes right inside the drum. This produces a very present and dry sound that was great for disco music before the Linn drum machine. I recommend putting a weight (sand bags are good) to hold the mic in place inside the drum.
 |
|
Figure 4
Alternate Kick Drum Mic Placement |
Some engineers like to place a second mic further out in front the kick drum to get a more ambient bass drum sound. I've used a PZM (pressure zone microphone) for this and just loved the sound.
Mixing the two mics is touchy business, and I recommend using a separate track for this mic. You'll also get a lot of spill from the rest of the kit that could wash out the total drum sound if this mic is monitored loudly.
Another mic position I have used is a second mic aimed at where the beater hits the rear head. This mic is place next to the kick drum pedal. You'll get completely different bass drum sound that might work great for your song but don't expect too much low end from this mic.
Microphone Choices
I like the Shure Beta52, AKG D 12 or D 112, and Sennheiser MD421U.
I'm a little reluctant to use a condenser or ribbon mic on the kick drum since a lot of air pumps straight out into the mic. This air blast can dislodge a ribbon or damage the capsule of a condenser.
There is also a high sound pressure level (SPL) present that can overload and distort; besides I have other better uses for condensers during a drum session. If you want to try a condenser on the kick, try the Sennheiser e865 hand-held that will take 150 dB SPL.
Pete's Place has an all-metal Blast Filter and it enables the use of condenser or ribbon mics in generally 'verboten' applications. Mounted on a standard microphone stand or gooseneck, not only does this filter kill air blasts P-popping and other plosives, it also lowers the actual SPL from kick drums, guitar amps, or ridiculous loud singers who insist on eating the mic!
One good trick is to use a compressor when recording the bass drum. I don't want a "compressed" sound here so gain reduction is almost zero--1 to 2 dB max. I'm looking for the added low end the compressor will bring up because it's different from just equalizing in low frequencies. Added low frequencies with an EQ never sound very good to me--more like the equalizer than true bottom. A drummer with an uneven bass drum level can be helped with a compressor, but this requires a super heavy squash to fix a problem. Starting out compressor settings would be a medium attack time and a 3:1 ratio.
Pete's Place Audio Blast Filter.
Snare Drum
I experiment often when recording snare drums. If you want to EQ the snare drum mic, use a very clean equalizer that can handle very high peak levels without distorting. Because a lot of the snare drum is heard in the overhead mics, I take the time to make sure the drummer is using the right snare drum for the song.
Thinking that you'll just re-trigger a snare sample replacement later, because the snare drum and the sound you're getting sucks, is the wrong attitude! Tuning is super important to me, and almost like a guitar, the snare drum must be tightened after each take. Start with a good (new?) head and make sure, like all drums, the lugs are all equally tensioned.
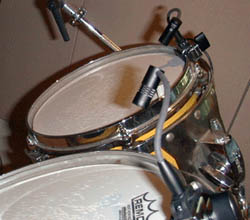
Figure 5 shows the typical snare drum mic position. I was lucky with this drummer; he had a space between the two toms enabling me to sneak in a brand-new Shure SM57.
 |
|
Figure 5
Typical Snare Drum Mic Placement |
The only other place to get a mic in is from the hi-hat side, but it's not ideal because the drummer will probably hit it. In general, I always aim snare and tom mics directly at the center of the drum head where the drummer should hit the drum, recording as much of the transient part of the drum hit as possible.
If there is too much "hit" and not enough tonality, then I'll move the mic slightly downward, in front of where it is hit. Inches of movement make huge differences.
Try to make sure not to aim the mic at a lug by positioning it equidistantly between two lugs. Pulling the mic back away from the snare drum greatly changes the sound. Doing this, generally produces a bigger and rounder tone with less attack and a little more ambience. I still aim the mic at the center of the drum and if the back of the mic touches the rack tom, use a right-angle XLR connector.
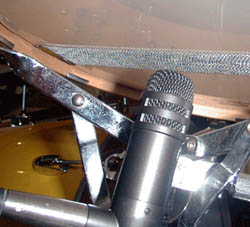 |
| Figure 6 Bottom Snare Drum Microphone |
Depending on the snare drum when a drummer hits hard, the attack or "stick" sound is so loud that you have to reduce the snare drum recording level so the peaks don't distort, and the result can be very little snare sound. You can use just about any mic under the snare. Sometimes I'll tape the mic right to the post of the snare drum stand with gaffer's tape if I can't get a stand positioned in and around all the other stands.
Very little of this microphone is used in my close snare drum mix - no more than 20 percent. I always flip phase on this mic since the top mic is facing it. Using the bottom mic can brighten the snare sound differently than an equalizer. I sometimes roll all the low end out of the bottom mic so it does not add any tone from the bottom head.
Microphone Choices
Some of my favorite dynamics for snare drum miking include a new Shure SM57 or Beta57, Sennheiser MD-421U (if you can fit it in), and Electro-Voice RE-20 (also if you have room).
Good condensers are Neumann KM184 or KM185, KM84, Sony C-37A, AKG C 414TLII and C 451 and C 452, and an old Norelco C60. The C 452 has a whole accessory set of swivels and attenuator pads that make getting in close on the snare drum easy. The Audix ADX90 electret condenser clips to the rim of the drum and is perfect when floor space for mic stands is limited.
Tom-Toms
The floor and rack toms are miked from the top only. I've miked the top and bottom of toms and I don't think it is worth it except for some strange and very tonal sounds or you're fighting stage leakage in a live sound recording. There is a point at which too many microphones around the kit will cause a loss rather than a gain. Further, I find myself obsessing on too many internal drum balances and not focusing on just making a good drum recording.
The principal question for tom mics is whether to use dynamics or condensers; both have advantages and disadvantages. Dynamics present a "dry" and immediately present sound. You'll have better isolation from the rest of the kit making balancing easier. Dynamics are also better for loud drummers who hit hard.
Condensers offer a fuller sound and are able to capture more of a drummer's subtleties. They are great for light to medium drum volumes. Disadvantages include more leakage, more expense and the risk of damage from being hit. They're also larger and prone to distort more at louder levels.
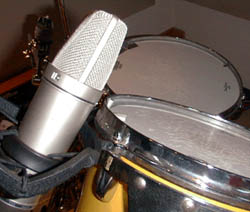 |
| Figure 7 Neumann U87 On A Tom-Tom |
 |
|
Figure 8
Electret Audix ADX90s On Tom-Toms |
Figure 7 shows a U87 on a rack tom. Make sure to have the -10 dB capsule pad switched in. I like this microphone especially for floor toms.
Figure 8 shows a pair of Audix ADX90s on the high rack toms; these are electret condensers that attach to the drum rims with built-in shock mounts.
Microphone Choices
Dynamics include Sennheiser MD-421U, Audio-Technica KP Series, Shure SM57, Beta52 and Beta57; condensers include Neumann U87, KM184 and KM185, AKG C 451, C 452 (w/pads and swivels) and C 414TL11, and Audix ADX90.
Hi-Hat
The all important hi-hat should be miked even though it usually cuts through all the other microphones. Use a condenser for this bright sound that can handle good, hot levels. I try to get a mic close enough to be almost in the drummer's way and aim it right where he is striking the cymbals. I record this mic on a separate track and sometimes roll out low frequencies so that the snare drum's (right next door) low end is not exaggerated.
Microphone Choices
Use condensers exclusively! Some of my favorites are AKG C 451 or C 452 with -10 dB or -20 dB pads depending on mic pre, Neumann KM185 supercardioid or the original KM84, or Sony tie tack mic on the end of a stick.
Room Mics
Room mics can often save an otherwise miserable sounding drum kit and lackluster drummer! The opportunity for sonic treatment of a room mic is almost endless and I always record it on a separate track for post-processing. Heavy compression effects work best while the drummer is playing because the compressor is presented with the maximum dynamic range possible. (think of dynamic range directly from microphones as a "reservoir" of the entire sound made in the room. Once recorded, this dynamic range is limited by the recording medium--even a digital recording since resolution varies with bit depth. When you have the sound made live, you'll have a lot more to work using EQ and compression etc.)
The old vintage tube compressors are popular for this, but I've had good luck with a Universal Audio 1176LN compressor/limiters, LA Audio Classic II Stereo compressor (these are both FET-based units) and Empirical Labs' Distressors.
If you're short of tracks, record this mic on one and monitor it in the middle of the drum mix. Adding a little of this mic gives the overall kit a definite room tone without washing out the stereo image.
Positioning the room mics is the most important decision: too close and it produces a not-very-useful tonality shift, and too far away causes a distant sound like added reverb. In an unfamilar room, this process may be a bit tricky, so don't hesitate to ask the advice of someone who should know where best to locate these mics.
Microphone Choices
Use any condenser that you would use for overheads or vocals. All of the aforementioned models will work fine, and there's a lot of room for experimentation.
Other Goodies For Getting Great Drum Sounds
Sennheiser Evolution Series Of Drum Mics
Shure's KSM44 Condenser Mic
Audix i5 Dynamic Mic
Audix Micro-D Series Drum Mic
HQ SoundOff Bass Drum Mute
Shure's KSM32 Condenser Mic
AKG C451B Reissue Condenser Mic
Monster Cable's Turbine Pro In-Ear Speakers
UKKO Contact Drum Mics By B-Band
Heil Microphones' PR 48 Kick Drum Mic
Heil's PR 20 UT Dynamic Mic
Audio-Technica' KP-Drum Mic KitPak
Granelli G5790 Right-Angle SM57 Mic
Kelly Shu Kick Drum Mic Isolation/Mount
|
|
|