by Barry Rudolph

Originally Published Online At PSW
|
The Tradecraft Of Recording Vocals
by Barry Rudolph
Originally Published Online At PSW |
|
 Someone once said: "A good music producer worries about the most important things at the most important times" and a good argument could be made that the most important things in Pop music production are the vocals.
The singer is charged with artistically conveying the song's lyric over a music track production that (hopefully) propels the song's meaning and emotion across to the listener in an accessible and entertaining way. Obviously the singer/artist/song are one of the main reasons engineers, producers, musicians and the studio personnel have jobs. They exist to facilitate the production of a song's music and vocal performances.
It is the focus of this article to deconstruct the process vocal recording in the studio.
Two Space Process
To better understand the process of recording vocals and for illustrative and tutorial purposes, I've divided it into two activities: what goes on in the studio area and what's required in the control room. For the one-room studio/control room situations, common these days combine both parts into a cohesive whole.
Out In The Studio
Recording studios come in all shapes, sizes and décors. There are only a few basic requirements conducive to getting a good vocal performance.
It does not take a special or a big room to record vocals but the studio's size, acoustic properties and construction are just as important as the recording space as they are for acoustically louder instruments like drum kits, brass or electric guitars.
Large Rooms
In the case of using a larger tracking room for overdubbing Pop music vocals, engineers and producers prefer to "stop down" its size in order to record a dry vocal sound with little of the room's ambient qualities included. This, of course, allows them the freedom of adding whatever ambient effects they feel appropriate later in the final mix.
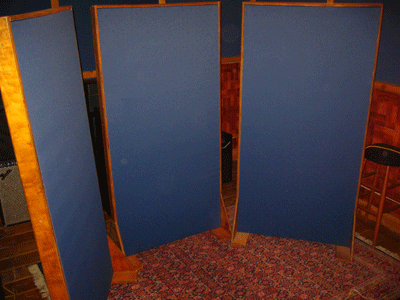 |
| Tall Gobos For Containing The Sound |
Tall baffles or gobos are placed around the singer and mic to stop most of the room's sound from being recorded along with the singer. If you are working in a large room with a pleasing decay time, there are plenty of reasons to record vocals sans any gobos. The difference in ambience could work well to layer multiple tracks sung by the same person such as for double-tracking or harmony stacking or for recording a singing group or choir.
You could capture a unique ambience possible only in that room instead of adding a simulation electronically from a commonly available digital reverb. I'm suggesting a high quality room like EMI's Abbey Road Studio 2--the Beatles' playground!
Smaller Rooms
If you are working in a small room or vocal booth, then dry is what you'll get but make sure the dryness is not more of a tonality--an actual comb filter EQ effect caused by close, highly-reflective parallel walls, floors and ceilings. Again the use of a few gobos with soft, non-reflective surfaces will help kill those reflections.
You might try a Se Electronics microphone Reflexion Filters--It uses a small screen of highly absorbent materials to surrounds the mic itself and prevents sound reflections entering the back and sides of the mic. Especially good for acoustically bad sounding spaces like bathrooms, closets and hallways, a microphone filter "separates" the mic's pick up of the singer completely from the coloration of the surrounding space.
If you're working in an "all in one space" studio, the room sound issues expand. You'll have to eliminate noises from your computer's fan(s), poor acoustics at the mic's position, and external noises from A/C equipment or the streets outside etc. VocalBooth.com makes portable vocal booths--these look like old-time "phone booths" with a window and door and come in different sizes depending on how big the vocal singing party is going to be.
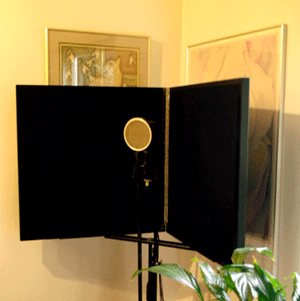 |
| Portable Vocal Booth At Tones 4 $ Studios |
My own Tones 4 $ Studios is a single space setup used mostly for mixing and for recording I use a product by RealTraps called a Portable Vocal Booth. It's a pair of 2 X 2-foot absorbent panels that mount to a mic stand and forms a right-angle corner behind the mic. This configuration does much more than a mic filter. Check This Vocal Booth
It removes the influence of the sound of the adjacent walls, provides isolation from the rest of the room's sounds--be it other musicians or the racket coming from my Pro Tools rig (computer, drives, power amp fans) as well as reduces external street noises. My singers appreciate it for the sound and also because they can pin the lyric sheets to the panels directly in front of them.
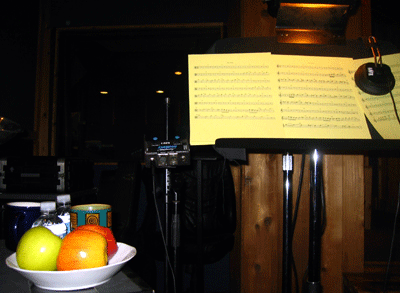
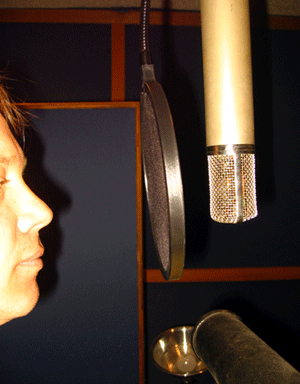
Singer's Station
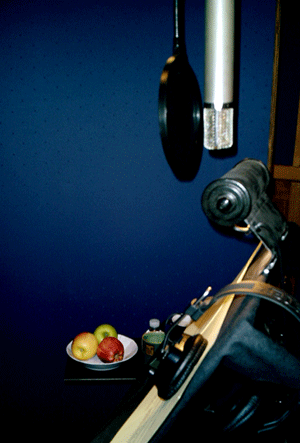 |
| Typical Office For A Vocalist |
The singer's "station" consists of a boom mic stand to hang the mic over and above the music stand, microphone, pop filter (if required), music stand with light, headphones and control box, stool, small table to hold tea, coffee or water etc. Or in the case of a female demo singer I once recorded (whose name I can't remember), a plate of strips of raw meat.
A metal music stand must be covered with soft cloth material to prevent sound reflection and checked to see if it vibrates sympathetically to the singer's voice. Make sure it does not.
The entire station should be placed on a rug to mute any foot tapping and stop sound reflections coming from the floor. All mic, headphone and power supply cables should be dressed away so nobody trips and pulls over a multi-thousand vintage condenser mic over.
I try to locate the station under dimmable studio lighting for this reason and also for reading lyrics and for seeing the singer's hand gestures and signals from in the control room--even if the studio is darkened.
 |
| Another View Of The Singer's Station |
The "look" of this setup--rug style, gobo colors etc. is up to the producer and artist's tastes and preferences. It should look warm and inviting to the artist and help set up the vibe of the session. I think this all helps in subtle ways--it is more special treatment for the artist and transforms the space.
However, for some artists and producers, none of this matters especially if scheduling, cost, budget and availability impinges on the optimum choice for a studio. At those places, you may have to do all this "remodeling and redecorating" yourself.
Sightline
With respect to the visual sightline to the control room, most of the time eye contact is wanted--remember the producer is acting as the listening audience and the artist will look for reassurance or emotional "feedback" from him/her, the engineer and anybody else in the session in the form of facial gesturing or even body language.
I've worked in studios that used closed circuit TV to see the artist singing who could not see us back in the booth. I can't prove any connection, but I bet the quality and emotion of the performance will be different--but depending on the singer, maybe better or maybe worst.
Microphone Choices
There are three microphones choices for vocal recording: condenser, dynamic and ribbon. The differences are vast and the right choice can make or break the vocal sound and performance.
Most of the time, a large diaphragm condenser mic is used for vocals for its ability to capture the loudest to the softest of sound and nuance. The large diaphragm offers a big surface area to pickup low frequencies and most modern condensers have huge dynamic range specs meaning it will be difficult to distort them with close, loud singing.
While old vintage condensers sound wonderful, I find them (depending on their condition and upkeep) a little more finicky, temperamental and a little unreliable compared to some of the newer mics coming from Germany.
So in the world of condenser mics there are a lot of great choices.
I like the whole line of Brauner mics; Neumann (both new and vintage models);
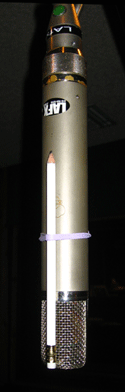
The old AKG C12 as pictured above; Sony's out of print C-800G and their vintage tube C-37;
Any Manley Reference Mic; David Bock's; Dave Pearlman's; John Peluso's remakes of classic vintage mics:
The 2247 SE or The P12 models.
Dynamics in the studio work great for loud and brute force singers. There is nothing like the urgency of the sound brought on by a good dynamic mic. Some singers must physically hold the mic to "produce" their vocal sound because they are used to working it during live shows.
I've tried to let them sing their vocal that way if there is no handling noise and minimal P popping. I've sometimes given the singer a handheld dynamic mic while standing in front of stand-mounted condenser mic. I would record both mics to two tracks and later go between them in the mix.
The list of good dynamics is long and here are a few worth using for studio vocals. I like Shure's SM7A or B, Electro-Voice's RE20 or RE27N/D, and Heil's PR 40, PR 22, PR 20 or PR 20 UT.
Ribbon mics have always been favorite vocal mics dating back to the 1930's. Today the modern versions are better than ever with wide-open sound, more gain and rugged ribbons less prone to damage from close vocals like the old classic models.
In general, ribbons are great for harsh or bright sounding voices that need mellowing. I like the AEA R84, Shure's KSM 353, and the Coles 4038 with its "brontosaurus bottom end."
Microphone Positioning
The mounting, positioning, distance from the singer, and even the angle of the mic all weigh heavily on the finished vocal sound.
I like to use a heavy floor stand and boom. I try to position the boom's counter-weight opposite the singer--out of the way. The counter-weight should be padded in case someone does not sufficiently tighten the stand's height and it slips and comes crashing down.
I learned a lesson years ago when, in a hurry, I (or the other assistant) didn't fully tighten a mic boom overhead of session drummer Earl Palmer's kit. Half way through the session it came down and the counterweight hit him in the head. The producer nearly called the session while ol' Earl stopped bleeding! Sorry again Earl!!!
I prefer to use a good shock mount microphone holder and hang it so the mic's capsule end is about eye level and aimed at the singer's mouth. Check with your singer who will have a definite preference as to the way they like to project sound towards a studio mic. It is better to angle the mic down rather than allow the singer to sing straight into the mic's capsule.
Windscreens--Pop Filters
 |
| Singer Straight On The Microphone |
 |
| The Microphone Angled |
If your singer cannot keep straight ahead or wants to sing directly into the mic, you'll have to use a screen. There are several great models out there and for the perfect popping storm--singers with an extreme popping problem try Pete's Place Blast Filter. Middle Atlantic has a more conventional two-stage nylon mesh type. The Stedman filter is also a good choice because, like the Blast Filter, it's metal and washable.
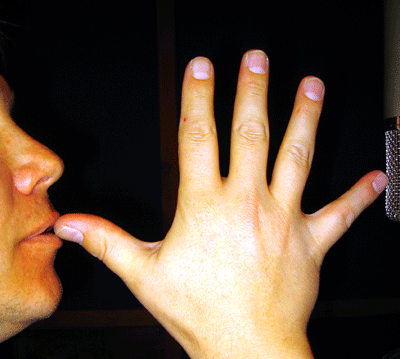
Pop filters change the sound slightly. There is a greater or lesser loss of super high frequencies depending on the particular filter. But there is another method to reduce plosives--an ordinary #2 pencil. Although not as effective for big pops, this trick will kill most small pops.
 |
| Pencil Pop Filter |
Singer/Mic Positioning
Listen to your singer over the monitor speakers to determine the correct distance from the microphone. You should have a fixed the initial distance back when you set the microphone height for the singer out in the studio. Some engineers will open a hand and use the distance from the end of the thumb to the end of the baby finger as the starting distance.
The volume or level of the human singing voice operates in ways very predictable. I've found (and then I've never recorded operatic singers) that generally Pop singers are loudest at near the top of their full-voice range and lowest in volume at the bottom of their range. Falsetto doesn't count here but singers with a falsetto louder than their full voice are in a blessed minority.
In the studio this is a consideration since this vocal dynamic range must be handled so that both the quieter moments and big and loud moments are accurately recorded without noise or distortion. This is accomplished by either changes in the singer's mic distance, a change in microphone pre-amp gain by the engineer, or the best solution, a combination of both.
If your vocalist sings loud all the time and all through the song, you'll want to pick a fix distance from the mic for your singer to stand--maybe mark an "X" on the floor with tape. For loud singing, this distance balances the mic's direct sound with the room's ambient contribution. Experiment with this distance because the room will contribute a feeling of size to a loud vocal that is energizing it.
At all times I try to keep my singer aimed at the mic's capsule. Singing only inches off beam will result in radical change in "mic presence"--the components of the sound that, to our sense of hearing, builds a solid mental image of the singer performing in front of you.
 |
| No Not An Obscene Italian Gesture |
If your singer is a live performer used to backing off the mic for loud moments and then "eating the mic" for the quieter bits, you can make use of this in the studio. But in the more sensitive studio, only a few inches in distance makes a huge difference. Too far off-mic sounds distant and too close builds low frequencies due to proximity effect and changes the vocal sound radically.
I've always preferred using the proximity effect on vocals if it sounds good. Proximity on soft vocals produces that "pillow talk" or "whispering in your ear" kind of close intimacy. To reduce the low frequency build up from excessive proximity, you will have to roll out LF or use the mic's roll-off filter or do both.
Proximity fattens thin-sounding voices nicely and I try to keep most singers on mic even when they hit the loudest, highest and full-voice moments where there can be a tendency for their sound to thin out.
For rangy melodies that require huge leaps of volume to hit high notes and big chesty gulps of air to power the low notes, I like to work with the singer--learn the ebb and flow of the vocal performance and invisibly "ride" changes in mic gain that will not affect mic presence noticeably.
I'm changing the gain staging slightly--1 to 4dB maximum. This is the audio level going into the compressor so that the amount of compression from the quietest to the loudest remains about the same--perhaps a little more squash on the loud notes if it sounds good and causes the vocal to ride well within the track.
Headphones
Headphones for you singer are very important. I have several different models I bring if the studio's selection sucks. All three of these models are closed-back, circumaural earphones that attenuate ambient noise and keep the cue mix from leaking out.
I like the Shure SRH840 phones for their fat and loud sound. The Ultrasone HFI-680 are bright phones your artist may prefer and finally the AKG K271 or some variant offer the most unvarnished truth of the sound.
Try to get your singer to keep both ears covered with the phone cushions to prevent spill. The phones should fit well and make sure a powerful amp drives them.
Part 2--Back In The Control Room
During a session, I remember when an artist was on mic out in the studio ready to start vocal overdubs, the producer asked: "how do we look in here from out there?" Interesting because he knew the appearance of the control room to the artist might affect the vocal performance. The control room (from the studio) does look like an aquarium with the huge window and the silent action of the animals encased within it.
Reactions to performances reflected in facial expressions and body language are everything to singers and musicians isolated out in the studio. The concern is that the working in the studio does not feel like being in a Petri dish under the microscopic scrutiny of the control room.
A great vocal sound starts with a good singer who has the artistic goal to perform the best vocal possible. Control room personnel--producer, engineer, assistants, gofers etc. all have a professional responsibility to work towards the pursuit of the artist's goals. For the first hour of a new vocal session, everyone in the control room is on a kind of "audition" until the artist feels comfortable and performs well.
It is the producer's job to create the studio setting--the whole "vibe" to help get a good vocal performance from the artist and to make everyone else produce their best work.
During a vocal session, the producer is the arbiter of the feeling and quality of the vocal performance. The producer is the artist's confidant, coach, good friend, creative partner, mentor, and most importantly the de facto proto audience--the first public ears on the artist and their music.
Because a well-prepared singer might give immediately the best and freshest performance in the beginning of the day, even during the microphone audition process, the engineer should be prepared and ready to record and capture a great vocal sound. The producer may require those mic audition recordings later and will be thankful for their useable fidelity.
The engineer's vocal signal chain should be powered up, working and adjusted somewhere in the "ballpark", the song booted up in the DAW with a new vocal track(s) ready to record, and a suitable monitor mix made and a useable cue mix done and checked in the singer's headphones.
Signal Chain--How Pro Can You Go?
Getting to know your favorite signal chain intimately is very useful for getting good vocal sounds quickly--especially in the case of the aforementioned first takes/microphone audition. You need to know what different combinations of mic pre-amps, EQs and compressors produce in terms of vocal sound possibilities. Experiment often if time and your clientele's interest permits.
I find the overarching difference between true pro gear and lower-end products is that professional gear is much more forgiving in it's operational requirements than cheaper gear. And that is not to say you cannot record useable sound using a $300 mic pre-amp versus a multi-thousand dollar boutique piece. You'll have to work a lot harder to get a good sound with the low dollar gear and you can make just as crappy of a recording with either it or with the high-end boxes!
For example, pro gear usually has much more headroom, a lower noise floor and higher dynamic range. You are less likely to overload the front end of pro mic pre-amps with a signal from a hot mic and a loud singer. High-end pro gear is smoother with less harmonic distortion at any operating level so the sound is automatically purer. Finally, pro gear will more often interface well. i.e. drive any subsequent processor you'd like in your vocal recording chain--from pro to junk.
I try to start with the best gear possible and I have my own collection to use when I'm "camping out" in a studio that does not offer my fave pieces. As an independent engineer, it's a smart investment to own a high quality professional vocal recording chain you can use anywhere.
Mic Pre-Amps
 |
| The Manley EQ500::One Of My Few Fave All-Tube Mic Pre-Amps |
Both types have their place in today's recording but my preference for vocals (unless directed otherwise by the artist and producer) is for a transparent and clean signal chain.
My recent choices for clean, discrete transistorized mic pre-amps include: George Massenburg Labs' GML 8302, Audio Engineering Associates' RPQ, Avalon Design's M5, and Millennia Media's HV-3C and the STT-1. For tube-based pre-amps that can be operated in clean modes, I've always liked Manley's Mic/EQ-500 Combo, Groove Tube's ViPre, DW Fearn's VT-1, and Telefunken's old V72 units. Tube mic pre-amps, by virtue of the tubes, have a built-in "personality". They can be very clean but, when overdriven, get into coloration zones unique to each of them.
 |
| The Exceedingly Vibey Helios 1r Twin Type 69 Mic Pre/EQ Pre-Amp |
"Colorful" transistor microphone pre-amps I like are: the old British Neve 1066, 1073 and 1084 modules for their thick-sounding Class-A design and line input, mic input and output transformers; for more punch and purity, I like the API (Automated Processes Inc.) model 512C amplifier for its Class-AB amp that gives a harder and "in your face" presence; the Helios Type 69 mic/EQ unit--is '60's-era technology and a very vibey sounding unit also from England; and the Chandler Germanium uses esoteric transistors to produce its unique sound.
Mic and Signal Chain System
When deciding on a vocal recording chain, consider both the mic and mic-pre as a system. If you are looking for a super warm and "tubey" sound try using a tube condenser and a tube mic pre-amp.
Such was my choice for recording Rod Stewart on a couple of albums. He sounded best on a completely stock and original Neumann U67 tube condenser (no pad and no roll-off) into a tube-based Manley's Mic/EQ-500 Combo that I followed with a TubeTech CL1-B or this plug-in version compressor--a slightly colorful and all tube signal chain. This chain did not accentuate Rod's raspy vocal quality we all love yet kept enough mid-range cut to compete with the track.
A much cleaner and more pristine path might be a Brauner Phanthera FET-based condenser microphone into a GML 8302 mic pre-amp followed by a dbx 160SL compressor that uses a VCA (voltage controlled amplifier) for nearly transparent gain control. This signal chain would produce a more neutral or uncolored sound that is completely faithful to the source. I've found recording choirs with a super-clean chain like this reproduces the rich harmonic content in the best way.
I liked the Phanthera into a Neve 1073 module followed by an UA 1176LN (Rev D) limiter for recording Pat Benatar's vocal. The Phanthera will handle all the loud level Patty can produce right on top of it without clipping. The Neve 1073, like all old Neve modules, doesn't sound good in clip and is a little unforgiving with regard to getting an exact gain setting so I set it a little low for the additional headroom.
After compression, I make up the record level within the very distinctive sounding 1176LN. Between the thickness of the Neve, the gritty edge of the 1176LN, and the pristine sound capture of the Brauner, this is a killer Rock vocal sound signal chain.
EQ and Compressors
Generally adding equalization in the recording is to make up for what the microphone is not giving you. In some studios, there is not a big choice of mics so you have to add or carve out frequencies to try and mimic the sound you'd get automatically with the right mic. Along with a signal chain, owning a few classic vocal mics is an obvious asset for a recording engineer.
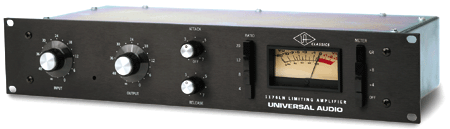 |
| The Venerable Classic FET Peak Limiter::UA's 1176LN |
The same goes for compression. There is a wealth of sonic possibilities using vocal compression especially with vintage classics like the >Fairchild 670 limiter. I love those sounds but when and how much depends very much on the "bigger picture"--the mix!
If you and/or the producer are unsure, compress only enough (at a low ratio) to get it recorded at a good level without distortion and errant peaks--and then back the compression down from there. For a vibey sound, go with a tube compressor like the TubeTech CL1-B or UA's Teletronix® LA-2 Leveling Amp. Cleaner or more transparent compression comes from VCA-based units such as a dbx 165. You could also record the vocals on two tracks: one with compressor and the other without. I like to provide as many options for the mixer as possible.
Part 3
Monitor Mixing
During vocal overdubs the control room monitor mix should contain only track elements that will be in the final mixed version of the song. Apart from possible loud headphone spill (Of these tracks) on the lead vocal track, logically the singer should not have to sing around music parts that may not be used.
Depending on where the vocals are added, the monitor mix could be just a simple rhythm track to a fully sweetened production. Some artist perform better hearing everything around them and others not. There are two considerations: a simple backing track gives more freedom to the singer for adlibs, improvisational vocal parts and customized "excursions" from the song's written melody. Changes in the song's arrangement and future production are often built stemming from these creative moments.
On the other hand, a properly pre-arranged, fully realized track production (brass, strings, solo section, backing vocals) affords the lead vocal to be produced and recorded emotionally and dynamically to "fit" the track perfectly.
As with all other critical overdubs, it's important to hear both the track and vocal more or less in the context of a final mix. I do prefer the overdub vocal(s) to ride above the track while working on it so that I can clearly hear the actual beginnings and endings of sung notes. In a lot of cases this mix works well for the singer's cue mix.
Cue Mixing
While the control room's monitor mix might fly for the singer's headphone mix as is, it is wise to be able to turn up the singer's vocal track even more in the phones. Call the "more me" control; if I am deriving the cue mix post fader from the monitor mixer, I just turn up the vocal track more.
I'm also careful about vocal effects like reverb and delays too. I prefer none but that's not always the case with the artist. Whatever minimal amount you can get away with, the better in my opinion
The concern is loss of a pitch reference when there is too much "me." This is the first place to check if the singer starts to get pitchy. Playing to many "pitch ambiguous" instruments, effect treatments and noises is also usually counter-productive.
Sure the mix sounds cool with all that stuff flying around but for the business at hand; I think your singer will stay in tune better hearing only sonorous, in tune tracking instruments such as pianos and well-intonated guitars. Tracks with wide chorus or flanger effects and loud atonal sound effects tend to disturb the ear's pitch recognition abilities.
Happy Vocal Recording
|
|
|