Barry's Mix Magazine Equipment And Software Reviews
Barry's Massive Discography And Engineering Career
Barry's Music Connection Magazine Reviews
Barry's Resolution Magazine Reviews
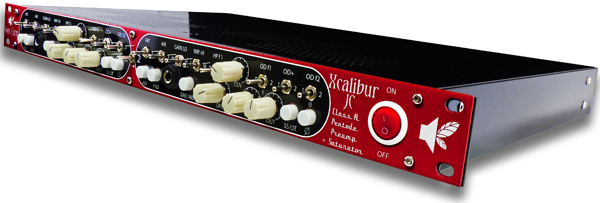
Sonic Farm Pro Audio Xcalibur JC Class-A Pentode Preamp Saturator
By Barry Rudolph
|
|
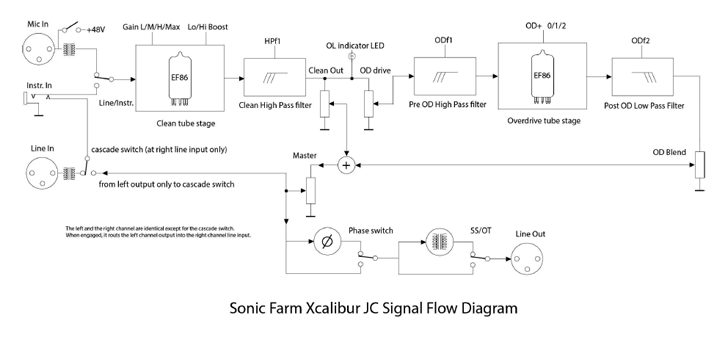
Introduced in 2018, the Xcalibur JC is a new variant of Sonic Farm Pro Audio's Xcalibur Pentode Preamplifier and Saturator. The "JC" model includes custom modifications specified by engineer/producer Joe Chiccarelli. Xcalibur is a sorcerer's apprentice; you can easily concoct a "shaman's potion" of tube-based saturation and filtered, overdriven sounds. ANALOG INSIDE AND OUT The Xcalibur JC has two identical channels of mic/line/instrument pre-amplification packed into a 1U steel cabinet. It has 38 front panel controls, jacks and switches, and the ability to serially cascade Channel 1's output into Channel 2's input. While in cascade mode, both channels' line outputs remain available. The interior of the Xcalibur JC is a marvel of construction. There is a shielded power supply and voltage regulator board--all DC voltages, even the tubes' filaments supply, are DC regulated. The rear panel has XLR inputs for both line and microphone sources, XLRs for the line outputs, a ground lift switch, fuse holder, and AC power selector switch. All switches are from Ningbo KLS Electronics. The heavy output transformers are securely mounted to the steel chassis and the two main boards, one for each channel, have vertically mounted daughter boards with two EF86s per channel plugged into ceramic sockets. The four EF86s are NOS Svetlana "Winged C" tubes sourced directly from Russia or Ukraine. Each channel has three input path choices selectable from the front panel. There are inputs for balanced microphone, line level, and a front panel 1/4-inch jack with 2.2 meg-ohm impedance for unbalanced keyboard instruments or guitars and bass. The rear XLR line level input automatically changes over to the 1/4-inch Instrument input when you plug into it. With the Line/Instrument Input button switched out, the mic input is active along with a large Cinemag CMMI-10 CPC input transformer. Cinemag also makes the Xcalibur's CMLI-15B line input and CM-13104 output transformers. You may order the unit fitted with iron core output transformers (as my review unit came) or Cinemag nickel/iron core transformers. Iron core transformers offer a softer high-frequency sound. There are front panel switches for +48-volt phantom and three different microphone input impedance choices: 10-kohms, 900-ohms and 2,400-ohms. Input impedance along with the switchable -15dB attenuator pad placed before the transformer affects the load presented to the microphone. I found changing impedance affects the sound and tone of dynamic microphones but not condensers. THREE STAGES Each channel of the Xcalibur JC has three sections, or stages. The signal chain order is: a clean gain stage, overdrive, and the summing/mixer/output section.
The clean microphone preamp stage uses an EF86 tube and sounds similar to Sonic Farm's Creamer Preamp in pentode mode. There is a three-position microphone Gain toggle switch with Lo, Mid and High positions. The three positions differ in gain by about 7 to 9 dB, but final gain depends on the settings of the Fat and Air filters built into the clean preamp circuit itself--they are not a separate EQ. The well-named Fat filter is a preset (6dB/octave) low-frequency shelving boost equalizer. It has a three-way toggle switch with a center flat position. Switching it to the left boosts from 400 Hz downward with maximum boost of 9 dB. When the Fat switch is set to the right, both the Fat and Air filters are bypassed and the maximum clean preamp gain is available. I liked the sound of the Fat filter--it uses an LCR filter circuit with its coil made in-house. The Air filter is an RC circuit, a 6dB/octave high-frequency shelf boost EQ with a three-frequency switch: left is 1 kHz, center is off, and to the right is 8 kHz with up to 9dB of boost. The amount of overall Fat and Air boost is adjustable via separate trim pots accessible through holes in the unit's top cover, but there is little need to ever adjust it. At the output of the clean preamp is a 6dB/octave highpass filter called HPf1. HPf1 has three cutoff frequency choices. Position O is off, 1 is 160 Hz, and position 2 is 80 Hz. WHERE ALCHEMY HAPPENS After the HPf1 filter, the clean preamp output signal splits and goes to a clean output level called CLN and also to the DRV control that sets the drive level or distortion of the EF86 Overdrive stage. There is a two-color, LED signal presence/overload indicator that monitors level at this split. CLN sets the clean signal level going to the Summing/Mixer/Output stage, and the BLD, or Overdrive Blend control, sets the Overdrive stage's output going into the Summing/Mixer/ Output stage. OVERDRIVE STAGE
The Overdrive stage uses a second EF86 tube in an overdrive circuit with an input highpass filter called ODf1 and an output lowpass filter called ODf2--another update in the JC version. The pre overdrive ODf1 highpass filter is bypassed when set to the left (0); the middle position (1) rolls off the bass and most of the midrange; and the right (2) position rolls off bass only. The new (also in the JC Model) OD+ overdrive gain toggle switch is a FET-based stage used in conjunction with the DRV control. OD+ will add more saturation, level and harmonics, and has three choices of gain: medium, low and high, with the latter mode adding the FET stage up to the point of fuzz. Next is the ODf2 lowpass filter for filtering out fizzy distortion; it has three corner frequency choices. Position 1 is 5.5 kHz @12dB/octave; at 0 is 18 kHz, or essentially flat; and position 2 is the darkest sounding position at 1kHz @ 6dB/octave. SUMMING/MIXER/OUTPUT STAGE Using the BLD and DRV controls, Xcalibur JC has the ability to carefully control the amount and color of added saturation using its third stage, a mixer/summing/output stage. The summing/mixer/output stage in the JC has a variable Output level control and uses a TI OPA2604AP op-amp chip for summing and mixing. Another op-amp drives the Output XLR directly when the OT/SS switch is set to SS (Solid-State). In the OT mode (Output Transformer), the chip drives the 1:1 primary of the output transformer that adds no gain. Because of a compact 1U front panel with not enough space to spell out the controls' full names, I quickly learned the abbreviations and the signal chain order. It is a "tweaker's paradise" that begs to be explored on a quest for just the right tone and overdriven, saturated sound. I found it well worth the effort. It turns out that these (mostly) center-positioned switches serve as default starting settings when building sounds. Suffice to say there is a lot of interaction with all the controls because in actual fact, you will be designing the unit's gain staging. Everything you touch affects the sound, tone and level coming out of Xcalibur JC. The DRV, CLN, BLD, and Master Output level controls are all conveniently clustered together in the center of each channel, which aids in the setup speed. IN THE STUDIO My first Xcalibur JC live recording session was setting up a recording chain for a singer/songwriter demo. I used one channel for a Roswell Delphos II Condenser vocal mic and the other channel for a Jensen Iso-Kit Direct Box to record his Taylor acoustic. A good practice is to set the CLN and Output controls in straight up 12 o'clock positions and keep DRV and BLD fully CCW (off) for now. I put all the toggle switches in the center positions, except the Gain switch on both channels was "H," and I switched HPf1 off on the vocal channel and to position 2 (80Hz) on the guitar DI channel. I juggled the CLN along with the Out control to set final recording level directly into Pro Tools. I preferred the SS position on the guitar DI channel, while the transformer OT path sounded great on the vocal channel. I did try saturating the acoustic guitar channel with a touch of the DRV and BLD controls--but the CLN level was the main show here. It is a bit tricky trying to set up saturation for live performance; I'd rather "re-amp" the clean track playing back later when I can spend time tweaking it. My singer remarked on "how present and upfront the vocal sound was without being overly bright!" OVERDRIVING
|
|
|
|